Baking acrylic paint in the oven has become a popular technique among artists and DIY enthusiasts.
It offers a convenient way to cure and harden acrylic paint, resulting in a durable finish.
So, can you bake acrylic paint in the oven?
However, before you embark on this baking adventure, it is crucial to understand the safety precautions and techniques involved.

In this article, we will delve into the world of baking acrylic paint in the oven, providing you with valuable insights, tips, and precautions to ensure a successful outcome.
Can You Bake Acrylic Paint?
Contrary to common misconceptions, it is indeed possible to bake acrylic paint in the oven. Baking can help speed up the curing process and achieve a harder finish.
However, it is essential to exercise caution and follow certain guidelines to ensure safety and prevent potential risks.
Safety Precautions
Safety should always be a top priority when working with any medium. Before diving into baking acrylic paint, it is important to understand the risks involved and take suitable precautions.
Proper ventilation is essential to avoid inhaling fumes, so ensure there is good airflow in your workspace.
Additionally, wearing safety goggles and gloves can protect your eyes and skin from any potential harm.
Temperature considerations are also crucial. Acrylic paint typically cures at temperatures between 200°F and 250°F (93°C and 121°C). Higher temperatures can lead to burning or damage, so it is crucial to monitor the oven temperature throughout the process. Invest in an oven thermometer to ensure accuracy.
Types of Acrylic Paint Suitable for Baking
Not all acrylic paints are suitable for baking. When choosing your paint, opt for oven-safe or heat-set acrylic paints. These paints are specifically formulated to withstand the baking process without compromising their color or finish.

Some popular brands that offer oven-safe acrylic paint options include DecoArt Americana Gloss Enamels, Pebeo Porcelaine 150, and FolkArt Enamel.
Preparing the Surface
Proper surface preparation plays a vital role in achieving successful results when baking acrylic paint. Start by selecting a suitable surface that can withstand the baking process, such as glass, ceramics, or wood.
Clean the surface thoroughly to remove any dirt, grease, or oils that may affect the paint’s adhesion. Sanding the surface gently can also promote better paint adherence.
Baking Techniques for Different Surfaces
Baking acrylic paint differs slightly depending on the surface you are working with. Let’s explore the techniques for baking acrylic paint on glass, ceramics, and wood.

Baking Acrylic Paint on Glass:
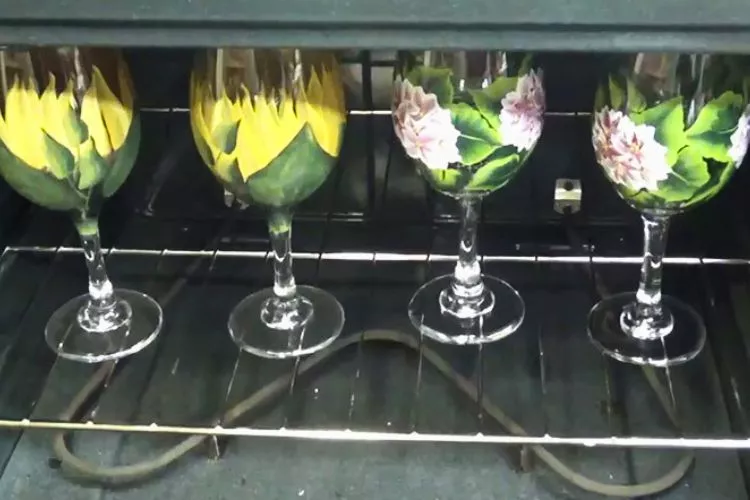
When baking acrylic paint on glass, it is essential to ensure the glassware is heat-resistant and oven-safe. Place the painted glassware in a cool oven, then gradually increase the temperature to the desired range.
Allow the oven to cool naturally after the baking process to prevent thermal shock and potential damage to the glass.
Baking Acrylic Paint on Ceramics and Pottery:
Ceramic and pottery pieces can also be baked to cure acrylic paint. Similar to glass, start the baking process in a cool oven to avoid cracks due to sudden temperature changes. Gradually increase the temperature and allow the ceramics to bake for the recommended time. After baking, let the ceramics cool in the oven to prevent cracks caused by temperature fluctuations.
Baking Acrylic Paint on Wood:
Wood is a versatile surface for baking acrylic paint. Ensure the wood is untreated and clean before applying the paint. Place the painted wood in a preheated oven at the appropriate temperature and bake for the recommended time. Once baked, allow the wood to cool completely before handling.
Steps to Bake Acrylic Paint in the Oven
To achieve the best results when baking acrylic paint, follow these step-by-step instructions:

- Prepare the surface by cleaning and, if necessary, sanding it gently.
- Apply the acrylic paint in thin, even layers, allowing each layer to dry completely before adding additional coats.
- Place the painted object in a cool oven.
- Gradually increase the oven’s temperature to the recommended range.
- Bake the object for the specified time, ensuring to monitor the oven’s temperature throughout the process.
- After baking, turn off the oven and let the object cool naturally inside to prevent potential damage.
Curing Process and Fixes
Understanding the curing process is crucial for obtaining the desired finish and addressing any issues that may arise. Acrylic paint generally cures within 21 days, but baking can accelerate the process.
However, keep in mind that the paint may continue to cure further after baking. If you encounter any curing-related issues such as bubbles or cracks, you can try sanding the surface gently and applying another layer of paint to achieve a smoother finish.
Pros and Cons of Baking Acrylic Paint
Baking acrylic paint has its benefits and limitations. Let’s explore both sides to help you make an informed decision.

Benefits of Baking Acrylic Paint:
- Faster curing time compared to traditional air-drying methods
- Increased durability and hardness of the final finish
- Elimination of potential moisture-related issues
Limitations of Baking Acrylic Paint:
- Limited color options available in oven-safe acrylic paints
- Risk of heat-related damage or color shifts if not executed correctly
- The need for a controlled and well-ventilated workspace
Frequently Asked Questions (FAQs)
Can you bake acrylic paint on polymer clay?
Baking acrylic paint on polymer clay is not recommended. Polymer clay requires a different curing temperature and duration, so it is better to use specialized paints specifically designed for polymer clay.
Is it safe to bake acrylic paint on porcelain?
Baking acrylic paint on porcelain can be safe as long as the paint and porcelain are both oven-safe. Check the paint and porcelain manufacturer’s recommendations to ensure compatibility.
Can you bake acrylic paint on ceramic?
Yes, acrylic paint can be baked on ceramic surfaces. Just ensure that the paint is heat-set or oven-safe, and follow the baking techniques we discussed earlier.
Can acrylic paint baked on glassware be dishwasher safe?
While baking can make acrylic paint more durable, it does not typically make it dishwasher safe. Handwashing is recommended to preserve the longevity of the paint.
How long can you bake acrylic paint in the oven?
The baking time may vary depending on the project and paint brand. Refer to the paint manufacturer’s instructions for the recommended baking duration.
Troubleshooting Common Issues with Baked Acrylic Paint
While baking acrylic paint can yield great results, there may be some challenges to address. Here are a few common issues and how to fix them.
Cracking or Chipping
One of the most frequent problems when baking acrylic paint is cracking or chipping. This can happen if the paint layers are too thick or if there is rapid temperature change during the baking process.
To avoid this, always apply thin, even layers of paint and ensure the object is heated gradually. Allow the painted item to cool slowly inside the oven to prevent thermal shock.
Bubbles in the Paint
Bubbles can form in the paint during baking, particularly if it was applied too thickly or if the oven temperature fluctuates. To reduce the risk of bubbles, always apply acrylic paint in thin layers, allowing each layer to dry before adding the next.
If bubbles appear during baking, you can carefully sand the affected area after the paint cools and apply a new layer of paint.
Uneven Finish
If you notice an uneven finish after baking, it may be due to improper surface preparation or uneven paint application. Ensure that the surface is clean and properly prepped before painting.
Lightly sanding the surface before painting can help improve adhesion. Also, always apply the paint in smooth, even layers for a consistent result.
Color Shifts
Heat can sometimes cause acrylic paint to shift in color, especially if it is not formulated to withstand high temperatures.
To avoid this, use heat-resistant acrylic paints specifically designed for baking. Always perform a test on a small section of the project before committing to the full bake.
Post-Baking Care
Once your painted object has been successfully baked and cooled, it’s important to handle it with care to maintain the longevity of the finish.
Although the paint will be more durable after baking, it’s still recommended to avoid harsh scrubbing or placing the object in extreme conditions.
For items that may come into contact with food or liquids, handwashing is advised to prevent damage.
Conclusion:
Baking acrylic paint in the oven can be a rewarding technique for achieving a durable finish.
By understanding the safety precautions, suitable paints, surface preparation, and baking techniques, you can confidently explore this method.
Remember to choose oven-safe paints, follow the recommended temperature guidelines, and monitor the baking process for the best results.
Always prioritize safety when working with any medium and enjoy the creative possibilities that baking acrylic paint in the oven can offer.

Meet Isabella Anderson, your acrylic painting mentor with over a decade of brush-wielding mastery. Dive into the colorful world of acrylics with her expert guidance, featured exclusively on ‘Acrylic Authority.’ Unleash your inner artist and explore the limitless possibilities of this versatile medium alongside a true acrylic aficionado.
